By Jeff Anderson EQ Magazine, June 2007
You’ve spent many restless nights dreaming about it, and now the time has finally come to build your own home studio. But how do you take a small space and turn it into a studio capable of turning out awesome sounding tracks? Worry not, dear readers: With the help of world-class studio designer Carl Tatz, we’re going to walk you through the process of designing, building, and treating your home studio. Starting from the ground up, we have all the tips, tricks, and studio designing secrets you’ll need to build your own modest session space – all without sacrificing your ability to get truly great sounds.CHOOSING YOUR SPACE
After making the decision to build a studio in your home, the first and most important step is deciding which room it will occupy. “The primary consideration in choosing the room of your home to implement a studio would be symmetry,” Tatz says. “A shoebox-shaped room is always best for a couple of reasons. The first is because of its simple symmetry, and the second is that with a shoebox shaped room it will be easy to calculate the primary axial modes in the room for the speaker and engineer’s placement.” But while the average room in a home is rectangular, chances are they also have some sort of closet and/or windows in them. As Tatz comments: “Windows are great but need to be addressed for two reasons: sound leakage, both going out and coming in, and their placement in the room. If you have a window centered on the front wall, in front of the console, you’re golden. However, if the window is off to one side it will make the room look and feel wrong. You may have one monitor in front of the window that has its own diaphragmatic acoustic properties and the other in front of a wall, making the two speakers each have a. different frequency response. The trick is to choose the end of the room that is most symmetrical from the front wall to at least a couple of feet past the engineer’s position.”ONE ROOM OR TWO?
The next decision is whether or not you want to split your room into two separate areas, or if you want to have both your tracking and control spaces together in one area. “It’s relatively easy to run a mic cable to another room dedicated to vocals and overdubs,” Tatz says. “If budget and need allow, you can always build an iso-booth in the same room if it’s large enough, but again, keep in mind that symmetry in the room is a virtue as you’re making your initial plans. Some musicians are happy to deal with headphones and be in the same room as the engineer while recording – but it can get difficult to dial in tones without using a proper monitoring system. “If you do decide to both track and engineer in the same room, I recommend that people put their computer and any other noisy gear that they have in a separate area, such as a closet,” Tatz advises. “The last thing you want is a high noise floor while you’re listening – or even worse, recording. A computer’s fan noise put to tape can totally ruin a recording. So put your gear in a roll out rack in the closet and install an exhaust fan that will both suck out the warm air and draw in the cool air from beneath the closet door. I highly recommend the System 1 Exhaust Module from ATM [www. activethermal.com]. The other alternative, if you don’t have a closet nearby, is to get a noise reducing cabinet, such as Sound Construction’s Iso Box [www.customconsoles.com]. Keep in mind that while these pieces work well, they can take up a lot of room in your small space.”DEALING WITH ELECTRICAL ISSUES
Other considerations lie in your studio’s air conditioning and electrical systems. “Having an air conditioning supply and return in your room is a positive. For the electrical in your studio, have an electrician make sure that the grounding is good in your home. Typically for a home studio, you will need three extra 20-amp circuits, as home studios usually don’t take up much power. Use one circuit for the computer, one for the outboard gear, and one for the monitoring system – sub woofers take up a lot of power! The Furmans, Monsters, Richard Grays, or Equi= Techs are worth having, but they only go onto one circuit and that can get expensive if you purchase one for each of the three circuits. Amplifiers have large transformers so they are more resilient other gear and don’t always require AC filtering/surge protection device like some power conditioners. Furthermore, it’s very important that you not have anything not related to audio, as lights or air conditioning, on your three audio circuits.”TO THE WALLS
At this point it’s time to address the issues of keeping sound from traveling outside of, and into, the studio, so you need to start planning out some ways to soundproof the room. “Mass is the best way to soundproof a room, which can mean layers of drywall, plywood, floating the floors, walls, and ceiling and if your budget can afford it – building a room within a room, which is by far the best way to stop sound:’ Tat2 believes. “There are new products that can help you with the construction. Quiet Solution [www.quietsolution.com] makes a sheetrock product called QuietRock that can be more effective than regular sheet rock. GreenGlue [www.greenglue.com] also makes a self-titled vinyl polymer product that you sandwich between layers of sheetrock that offers similar results to the OuietRock. (Incidentally, Quiet Solution makes a very similar product to the GreenGlue called QuietGlue.) If you are on a tight budget, try using GreenGlue or OuietGlue to add another layer of sheet rock onto your existing walls. This is one of the most cost-effective ways to add mass to what you already have. One thing that I advise people is that someday you may resell this space, so don’t go too crazy. Kinetics Noise Control [www.kineticsnoise.com] is also a great resource for isolation products, so check them out as well”ALL ON THE FLOOR
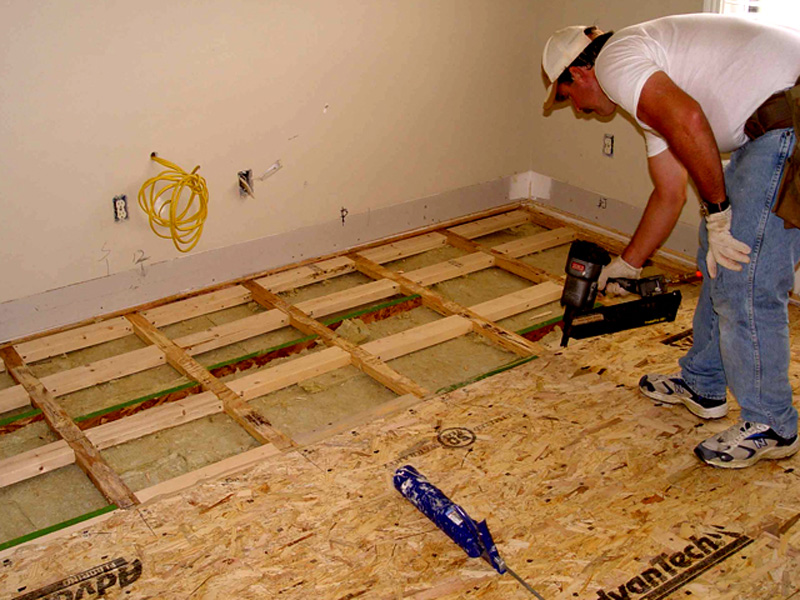
Once the walls have been treated, focus on the flooring. There are three reasons to float a floor: to make the room sound better, to provide isolation, and to run cable through the space to service your studio. “To build a real floating floor, for sound isolation purposes, the best way to do it is to construct a frame in a grid shape with upright 2 x 4s:’ Tatz advises. “The trick to all floating floors is to make sure that they do not touch the walls. Try to keep the entire floor at least 1/4″ away from the wall. Even once you’ve completed the floor, you want to keep the baseboard trim at least l/8” from the floor so that it is not transferring the sound from the walls to the floor. “Once you have the ‘grid’ constructed, run your audio snakes and cabling through the grid and fill all of the empty space with 4″, 8lb. rockwool or Owens Corning R13. Then place 1″ x 6″ strips of closed-cell neoprene, or Auralex U-Boat Floor Floaters [www.auralex.com], every foot underneath the 2 x 4s. On top of the grid, glue and screw 3/4″ tongue and groove decking. You can add more mass to this to increase isolation by adding layers of 5/8” sheet rock and finish with more decking. Of course, as you plan this out, keep in mind that by adding mass to your floor you will be incrementally lowering your ceiling height. “On the top layer, add your carpet or hardwood floors. Chances are that you will have a rolling chair set up in front of your gear. If you plan on using carpet for your control room, consider building a wood floor ‘box: or area on which your chair can roll around.” There is also a poor man’s way of making a floating floor. As Tatz says: “Try putting down a layer of 3/8” Owens Corning Quietzone Acoustic Floor Mat [www. owenscorning.com]. Then put the decking right on top of that. I usually do this when there is a concrete slab. Again, as with all floating floors, be sure not to touch the walls with your floor. And be aware, the effect of building this floor isn’t for isolating the sound from and to below, although it will help. Building this floor will make the room sound, and feel, much better:’DOORS OF PERCEPTION
Poor choices in door selection/placement can lead to serious sound leakage problems in a studio. Tatz recommends “installing two 1-3/4″ thick solid core doors, with space in between each, opening in opposite directions” to combat this problem. “If you choose to, you can also use two glass doors that are made of 3/4′ laminated glass:’ Tatz continues. “The cheapest way to soundproof the doors is to get an exterior door jam, with gaskets already on the top and both sides. On the bottom, you can get a sweep, or make your own jam so that you have a gasket all the way around. By using the external jam, most of the sound that does get through will pass through the gasket. However it’s mostly high frequency sounds, so if you have two doors it’s really not an issue. “If you can’t manage two doors because of space restrictions at least use one solid core door – and beef it up with an additional rubber screw-on door gasket. It’s not perfect, but you don’t always need perfect. With the extra gaskets you will stop at least some of the sound from passing through.”TREAT YOUR ROOM (AND YOUR MAMA) RIGHT
“The main issue to address in a listening environment is the first reflections from the monitors,” Tatz tell us. “Sit in the engineer’s position and have someone hold a mirror up along the sidewalls. Where you see your speaker’s drivers is where you will place your treatment. Repeat this for the ceiling as well. The ceiling is the most overlooked spot and is very critical. If the first reflections are not treated you will have to suffer with comb filtering, meaning the monitor’s direct signal will be combined with the reflected sound, causing phase and delay cancellations. This will cause destructive peaks and dips to the overall frequency response. Once the first reflections and ceiling are taken care of, treat the back wall. You don’t want sound coming back to you in the mix position from the back wall or any of the first reflection points. Once you’ve taken care of the back wall, treat the front wall with some evenly spaced panels to attenuate the speaker boundary effects. “The best treatment to use in small rooms is 4” of 703 fiberglass wrapped in a fabric panel. These panels will absorb down to 125Hz. Thinner panels will start to make the room sound ‘honky; because they are taking out only the highs and upper midrange frequencies. [Note ‘on low-end absorption: Corners are where the energy builds up; ceiling corners in particular are where things will get funky. Don’t think that sticking a foam wedge ‘bass trap’ in a corner is going to do anything below 125Hz. Auralex makes the CT45 corner panels that have a 45° angle on them. Real Traps (www.realtraps.com) offer low-end comer absorption panels (Corner Mondotraps). RPG (www.rpginc.com) also offers the Modex Corner. Try these or similar products instead of foam wedges.] “Generally speaking, my philosophy is that absorption is your best friend in a small control room while diffusion and absorption are your pals in a tracking room. After you’ve done the above, you can tame down the flutter echoes along the parallel sidewalls by placing panels as you see fit. It doesn’t take much. And don’t worry about reverb time you don’t have any. This is small room acoustics, not auditoriums.”